Our induction heating systems require maintenance services from time to time. One example of that is changing the glycol or antifreeze fluid in the Inductor® ALFe® 3.5. Per the ALFe manual, “After a working period of about 1 year, it is advisable to replace the antifreeze fluid both to increase the service life of the machine components and for a working cycle that is efficient in terms of time.”
The glycol/water mixture that runs through the ALFe units acts as the coolant that keeps the coils from getting too hot. The coolant moves through our attachments like the Flow Concentrator, which is a water-cooled conductor made of copper tubing formed into the shape of the coil for the induction heating process. Induction heating coils do not get hot as water flows through them.
Download the Step-By-Step Guide to Changing Glycol Here
Features Included in the ALFe 3.5 Unit
The Inductor ALFe 3.5 is part of Induction Innovations’ product line of heavy-duty induction heating systems. The ALFe line is ideal for repair shops that require high-end heat levels to release seized parts and panel bond adhesives from steel and automotive-grade aluminum.
The ALFe 3.5 is our 3500-watt unit. It includes a built-in power supply with a safety shut-off, LED light indicators, 9-minute on time, and 230v/16a/p1. This unit comes with three attachments including a Flow Concentrator, Glass Blaster attachment, and a Fast-Off Pad. It also includes an instruction manual and a one-year warranty.
Applications of the ALFe units include heating bolts, graphics, releasing auto glass, stress-relieving frame rails, annealing metals, and fabrication.
For more information on our other ALFe units including the Inductor ALFe 5.0 and 13k, our 5000- and 13,000-watt units, check out the ALFe Model Comparison Guide.
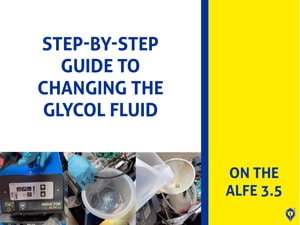
Step-By-Step To Replacing Glycol Mixture
In this guide, accompanied by a video (see below), our Operations Manager, Paul, takes us through the procedure of removing the housing, changing out the fluid, and how to make sure the unit is in proper working order.
Emptying the Existing Glycol
- Step One – Unplug the unit and remove the 14 screws from the blue housing.
- Step Two – Take the housing off and disconnect the ground wire attached to the housing.
- Step Three – We will be removing the braided hose from the radiator, so you need to loosen up the C clamp (but keep it on the hose so you do not lose it)
- Step Four – Put rags down to cover the boards inside the unit in case of any spills (do this before removing the hose) and gently pull the hose off. You may need pliers to get the hose disconnected.
- Step Five – Put the free end of the hose into your discard bucket and then remove your rags. Make sure there is no water leakage.
- Step Six – Plug the unit back in (you will use the pump to get the glycol out) and turn it on.
- Step Seven – When the unit is on, the pump will start flowing and the mixture will drain into your bucket. You can remove the cap while it is emptying.
- Step Eight – When the pump is empty, you will hear a beep. Turn off the unit and disconnect the power. We are ready to refill!
Refilling the New Glycol Mixture
- Step Nine – Reconnect the hose with the c clamp back onto the unit. Check for leakage again.
- Step Ten – Test your glycol mixture with a refractometer to confirm it is at the level you want it. For our location, we wanted it at zero degrees 38%. Our levels are good so we will continue. But your area might be different depending on how cold it might get.
- Step Eleven – Place a funnel into the tank and pour your mixture in (fill up).
- Step Twelve – Take off the funnel and plug the unit back in. Turn the power on. You should start seeing the fluid circulating through the braided hose. (This is a suitable time to check for leaks again. Make sure there is no beeping).
- Step Thirteen – If everything is good to go, disconnect the unit from power and reverse the procedure. Put the cap back on and plug the ground wire back into the housing. Put the housing back on and secure it with those 14 screws.
And you are done!
Watch the full video here:
Learn More About the ALFe Series
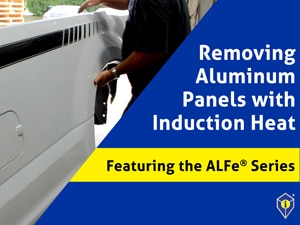
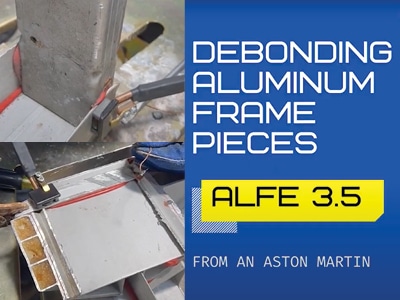
Check out our latest blog on Debonding Aluminum Frame Pieces of an Aston Martin or our blog on Straightening Driveshafts. Also, check out this video on How To Remove an Aluminum Bedside Panel off a Ford F150!
Contact Us:
Have questions about our ALFe Series or the glycol changing process? Reach us via phone at 877-688-9633 or email at [email protected].
Follow us on social media: Facebook • Instagram • LinkedIn • TikTok • YouTube
-

January 30, 2026
Professional Automotive Repairs Powered by the Inductor® Max
The Inductor® Max is engineered for professional auto body and mechanical shops that demand precision,…January 30, 2026
Professional Automotive Repairs Powered by the Inductor® Max
The Inductor® Max is engineered for professional auto body and mechanical shops that demand precision,… -

February 20, 2025
Beginner’s Guide to Removing Auto Glass Like a Pro with the Glass Blaster Tool
Windshield—or “windscreen” removal, for our international colleagues—has long been a challenging process for body shops…February 20, 2025
Beginner’s Guide to Removing Auto Glass Like a Pro with the Glass Blaster Tool
Windshield—or “windscreen” removal, for our international colleagues—has long been a challenging process for body shops… -
April 29, 2022
How to Remove an Aluminum Panel off a Pickup Truck with Induction Heat
Did you know you can remove an aluminum panel off of a truck with induction…April 29, 2022
How to Remove an Aluminum Panel off a Pickup Truck with Induction Heat
Did you know you can remove an aluminum panel off of a truck with induction… -
February 18, 2022
Can the ALFe 3.5 Debond Aluminum Frame Pieces of an Aston Martin?
The ability to connect with customers and their applications is of great importance to us…February 18, 2022
Can the ALFe 3.5 Debond Aluminum Frame Pieces of an Aston Martin?
The ability to connect with customers and their applications is of great importance to us…
